
Frequency Filters
|
Available in VoceVista Video and higher
Frequency Filters are only available in VoceVista Video and higher. |
Frequency Filters are a powerful tool that allows you to listen to the different frequency ranges of a sound separately. This enables you, for example, to inspect individual overtones of a recording, or to reduce or amplify the singer’s formant and hear the effect of this change.
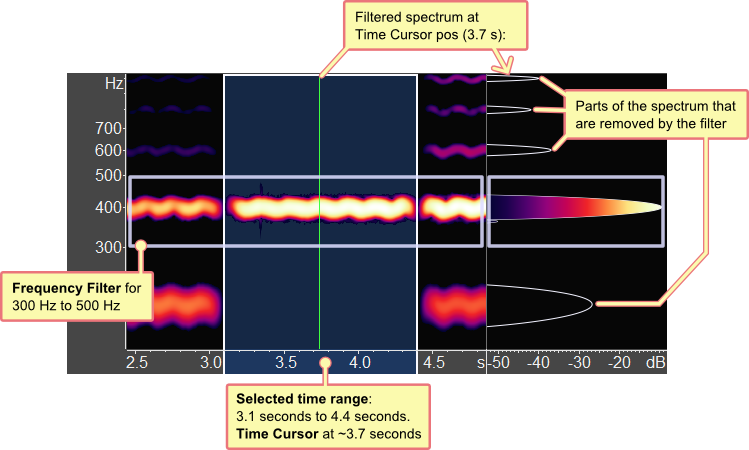
Using a Frequency Filter shows a frequency filter that removes any frequencies outside of the range from 300 to 500 Hz. The left side of the image shows the spectrogram with a time selection. Only the selected time range is filtered.
The right side of the image shows the spectrum. The only part of the spectrum that is left by the filter is the second harmonic at 400 Hz. All other parts are removed, and will not be audible when the recording is played back. However, you can still see the outline of the removed parts.
Using Frequency Filters
Create a new filter by clicking on . If the new filter is not visible, scroll the Frequency Scale down or zoom it out until you see the filter.
You can move and resize the filter with the mouse. Here is an overview of the various controls:

Move filter
Simply grab the frame of the filter with the left mouse button to move it to a different frequency range.
Move multiple filters in parallel
If multiple filters exist, a new handle will appear next to the handle for resizing the frequency range. This new handle allows to move all existing filters in parallel as a group.
Resize filter
The width of the filter can be changed by moving the red resize handles in the middle of the filter. If you hold Ctrl while using the resize handles, the filter is resized symmetrically around its center.
Toggle additive or subtractive mode
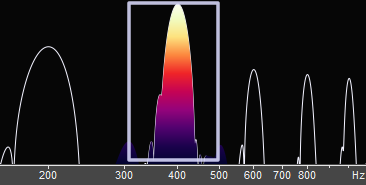
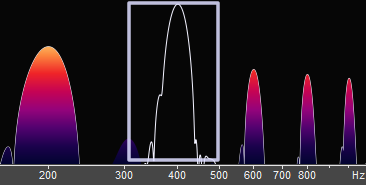
The + and - buttons change the behavior of the filter. An additive filter (+ Mode) keeps the filtered frequencies and removes everything else. A subtractive filter (- Mode) removes the filtered frequencies and keeps everything else.
Change filter strength
By default, the filters are an all-or-nothing affair. This can be changed by moving the Filter Strength Slider (shown in Filter Controls).
Filters menu
The Filters menu has entries to add a new filter, and to toggle between the + and - modes. It also has the following entries:
Enable real time filter preview
If this option is checked, the effect of the filter is shown immediately, both on the spectrogram, and for playback. This means you can see and hear how your recording is affected by the filter. You can generally leave this on, but in some cases it may be helpful to turn it off. In particular, you might want to arrange filters and still see the unmodified spectrogram before turning the filters on.